Building an ELT Pipeline in Python and Snowflake


ETL (Extract, Transform, Load) and ELT (Extract, Load, Transform) are two processes used for integrating and transforming data, but they have different approaches. Think of it like cooking a meal — ETL is like preparing and chopping all the ingredients before cooking, while ELT is like cooking the ingredients first and then adding spices and seasonings to taste.
The key difference is that in ETL, data is transformed before being loaded into a data warehouse, whereas in ELT, the raw data is loaded into the warehouse first and then transformed using SQL or other data transformation tools.
Both ETL and ELT have their own advantages and disadvantages.
- Personally, I prefer ELT over ETL because it’s more flexible and makes it easier to store new, unstructured data. With ELT, you can save any type of information without having to transform and structure it first, which gives you immediate access to all your information.
- ELT is faster than ETL when it comes to data availability. With ELT, all the data can be immediately loaded into the system, and users can then decide which data they want to transform and analyze.
- ELT also requires less maintenance compared to ETL. Since it’s cloud-based, it uses automated solutions instead of relying on manual updates.
- Loading data is quicker with ELT because the transformation step occurs only after the data has entered the warehouse. This helps to reduce the time required to load the data into its final location.
However, whether to use ETL or ELT depends on the specific business needs. At my work, we mainly use ELT based on our business requirements.
Learning how to build ETL and ELT pipelines is an essential skill for data professionals, as it helps to streamline data integration and improve the accuracy and reliability of data analysis.
In this article, we’ll demonstrate how to build a simple ELT pipeline in Python using New York City Restaurant Inspection Results data from NYC open data. DOHMH provide an Open API to their data. We will extract the data from NYC Open Data, load it into Snowflake, and then transform it using SQL.
We will find the number of inspections that took place in various boroughs of New York, broken down by year. Our pipeline involves three steps:
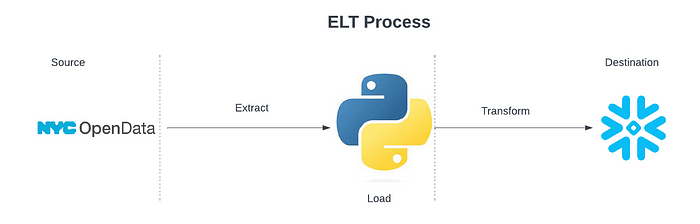
- Extracting the necessary data from NYC Open Data
- Loading the data into Snowflake
- Executing a query to perform the desired analysis.
Extracting NYC Data
This code retrieves data from an NYC API endpoint and prints one record to check its structure and the total number of records available. Next, it verifies if the response code is 200, indicating a successful request, and gets the number of records using the ‘X-Total-Count’ header in the response. Finally, it returns the JSON data.
import requests

# Define the API endpoint URL
url = "https://data.cityofnewyork.us/resource/43nn-pn8j.json"

# Send a GET request to the API endpoint
response = requests.get(url)

# Check if the response was successful
if response.status_code == 200:
    # Convert the response data to a JSON format
    data = response.json()

    # Get the total number of records available in the API endpoint
    num_records = int(response.headers.get('X-Total-Count', 0))

    # Print the number of retrieved records and the total number of records
    print(f"Retrieved {len(data)} records out of {num_records} total records")

    # Print only one record of the retrieved data
    print(data[:15])
else:
    print("Failed to retrieve data from the website.")
Retrieved 1000 records out of 0 total records
[
{
"camis":"41283963",
"dba":"PAPA JOHN'S",
"boro":"Brooklyn",
"building":"5804",
"street":"5 AVENUE",
"zipcode":"11220",
"phone":"7189217272",
"cuisine_description":"Pizza",
"inspection_date":"2022-01-26T00:00:00.000",
"action":"Violations were cited in the following area(s).",
"violation_code":"04L",
"violation_description":"Evidence of mice or live mice present in facility's food and/or non-food areas.",
"critical_flag":"Critical",
"score":"13",
"grade":"A",
"grade_date":"2022-01-26T00:00:00.000",
"record_date":"2023-04-14T06:00:10.000",
"inspection_type":"Cycle Inspection / Re-inspection",
"latitude":"40.640525637746",
"longitude":"-74.015090336292",
"community_board":"307",
"council_district":"38",
"census_tract":"007400",
"bin":"3397962",
"bbl":"3008550037",
"nta":"BK32"
}
]The API provides JSON results without nested JSON, comprising a total of 1000 records.
Loading Data
We can load the data into Snowflake using Snowflake connector. The Snowflake Connector for Python is a native Python package that allows Python applications to connect to Snowflake and perform standard operations. It provides Connection objects to establish connections with Snowflake and Cursor objects to execute DDL/DML statements and queries. The connector has no dependencies on JDBC or ODBC.
Let us create a function for uploading the data.
# Installing the snowflake connector
!pip install snowflake-connector-python

import snowflake.connector
import requests
import json

def upload_data_to_snowflake(account, user, password, database, schema, warehouse, role):
    # Connect to Snowflake
    conn = snowflake.connector.connect(
        user=user,
        password=password,
        account=account,
        role=role
    )

    # Create a new database
    conn.cursor().execute(f'CREATE DATABASE IF NOT EXISTS {database}')
    # Switch to the new database
    conn.cursor().execute(f'USE DATABASE {database}')
    # Create a new schema
    conn.cursor().execute(f'CREATE SCHEMA IF NOT EXISTS {schema}')
    # Create a new warehouse
    conn.cursor().execute(f'CREATE WAREHOUSE IF NOT EXISTS {warehouse} WAREHOUSE_SIZE = XLARGE AUTO_SUSPEND = 300')
    # Switch to the new schema
    conn.cursor().execute(f'USE SCHEMA {schema}')

    # Define the table schema
    table_name = 'inspection'
    table_columns = []
    table_schema = ''

    response = requests.get('https://data.cityofnewyork.us/resource/43nn-pn8j.json')
    data = json.loads(response.text)
    if len(data) > 0:
        for column in data[0]:
            if column == 'location_1':
                for sub_column in data[0][column]:
                    table_columns.append(sub_column)
                    table_schema += sub_column + ' STRING,'
            else:
                table_columns.append(column)
                table_schema += column + ' STRING,'
        table_schema = table_schema[:-1]  # Remove trailing comma

    # Create the new table
    if len(table_columns) > 0:
        conn.cursor().execute(f'CREATE TABLE IF NOT EXISTS {table_name} ({table_schema})')

        # Load data into the new table
        for row in data:
            values = []
            for column in table_columns:
                if column in row:
                    values.append(row[column])
                else:
                    values.append(None)
            query = f"INSERT INTO {table_name} ({','.join(table_columns)}) VALUES ({','.join(['%s']*len(values))})"
            conn.cursor().execute(query, values)

    # Close Snowflake connection
    conn.close()

# Calling the function
upload_data_to_snowflake('fdwezqs-ba73954', 'sdhilip200', 'XXXXXXXX', 'Inspection', 'raw', 'nycwarehouse', 'ACCOUNTADMIN')
The above function loads the data into Snowflake.
First, the code connects to a Snowflake database using the provided credentials and creates a new database, schema, and warehouse if they do not exist. It then switches to the new database and schema.
Second, it defines the schema of a table named ‘inspection’ and extracts the column names and types from a JSON file obtained from an API. It creates an empty list to store the column names and an empty string to build the schema. It makes an HTTP GET request to the API to retrieve the JSON data. If the data is not empty, it loops through the keys of the first item in the data and adds the key and subkeys (if ‘location_1’) to the column list and schema. Finally, it removes the trailing comma from the schema string.
Third, the code creates a new table named ‘inspection’ in the database and then loads data from the API into that table. It checks if the table has any columns, creates a table if not, and then iterates over the data, creates a query to insert data into the table, and then executes the query with the data values.
Fourth, the code closes the Snowflake database connection.
Lastly, the function upload_data_to_snowflake is called with specific parameters to upload data from an API into a new table in a Snowflake database with specific credentials and settings.
You can get the snowflake admin details from youraccount_identifier.snowflakecomputing.com along with your username and password. In this example, I have created database called Inspection , Schema called raw , Warehouse nycwarehouse . account_identifier is your account name and created XLARGE warehouse in this example. Since I am using a Snowflake free account, my role is ACCOUNTADMIN by default.
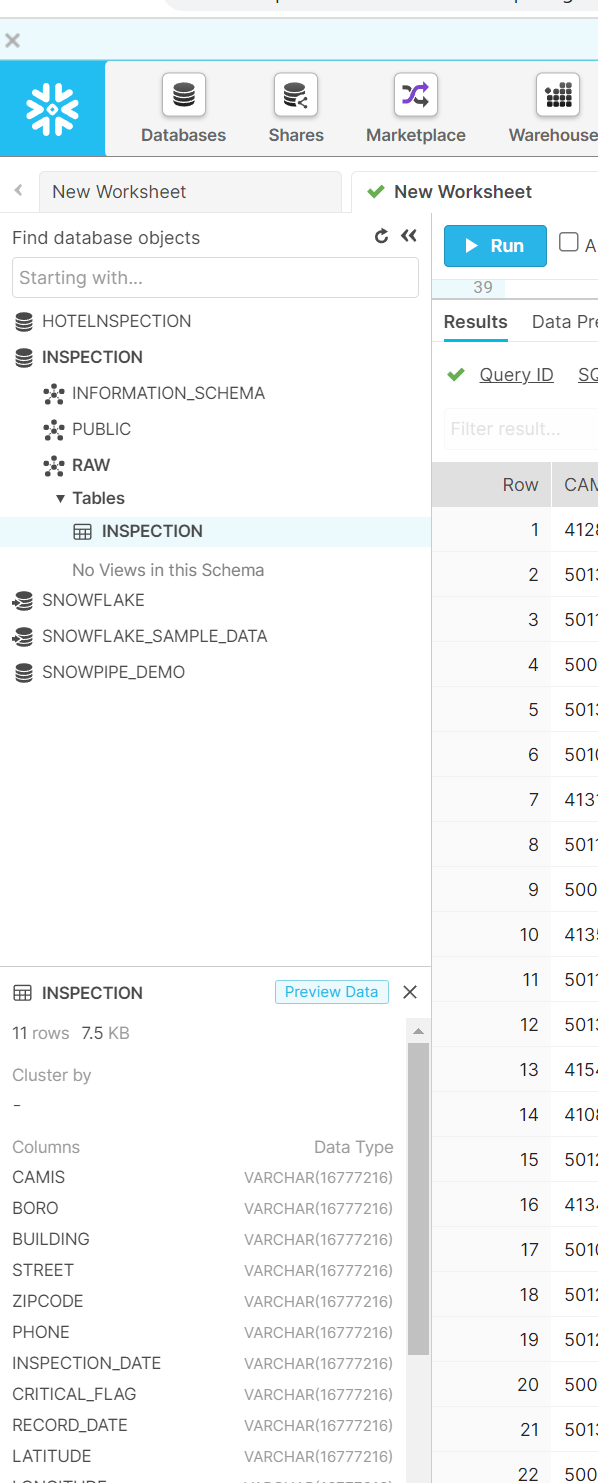
Now we have our inspection table in the Snowflake
Transforming Data
We need to create a table called inspectedhotels for the final step in our pipeline transformation. This table will contain the number of inspections that have taken place in various boroughs of New York, broken down by year. Please note that inspection dates of 1/1/1900 indicate that an establishment still needs to be inspected. Therefore, we will query the data for inspections that occurred from the year 2000 onwards.
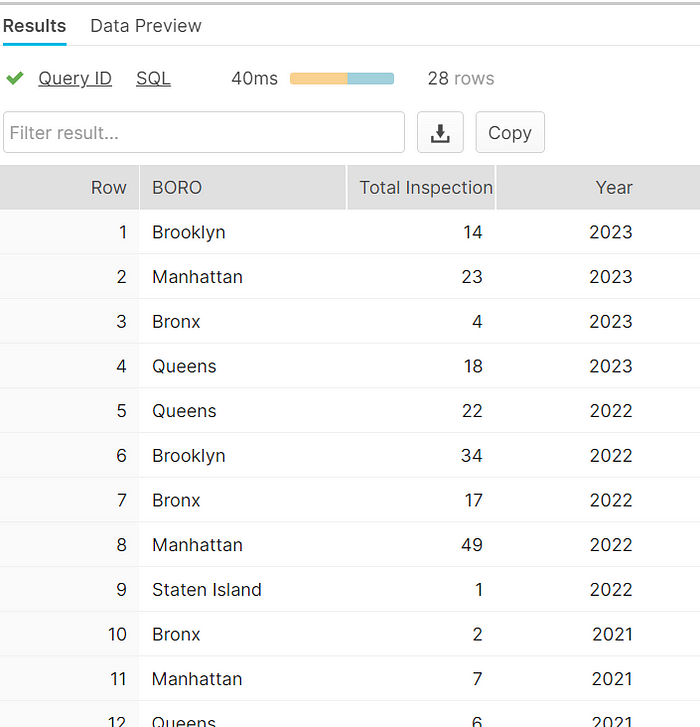
Let’s find the number of inspection by using below query,SELECT Boro,COUNT(*) AS "Total Inspections", YEAR(CAST(Inspection_date AS DATE)) AS "Year"
FROM raw.inspection
WHERE YEAR(CAST(Inspection_date AS DATE)) >= 2000 AND Boro NOT LIKE 0
GROUP BY YEAR(CAST(Inspection_date AS DATE)), Boro
ORDER BY YEAR(CAST(Inspection_date AS DATE)) DESC;
Let’s create this query result as a table called inspectedhotels under the new schema called curated.
-- Use the "HOTELINSPECTION" database
USE DATABASE HOTELINSPECTION;
-- Create or replace the "CURATED" schema
CREATE OR REPLACE SCHEMA Curated;
-- Create or replace the "INSPECTEDHOTELS" table in the "CURATED" schema
CREATE OR REPLACE TABLE CURATED.INSPECTEDHOTELS (
Boro VARCHAR(50), -- Column for borough name
"Total Inspections" INTEGER, -- Column for total number of inspections
Year INTEGER -- Column for inspection year
);
-- Insert data into the "INSPECTEDHOTELS" table
INSERT INTO curated.Inspectedhotels (Boro, "Total Inspections", Year)
SELECT Boro, COUNT(*) AS "Total Inspections", YEAR(CAST(Inspection_date AS DATE)) AS "Year"
FROM raw.inspection
WHERE YEAR(CAST(Inspection_date AS DATE)) >= 2000 AND Boro NOT LIKE 0
GROUP BY YEAR(CAST(Inspection_date AS DATE)), BORO
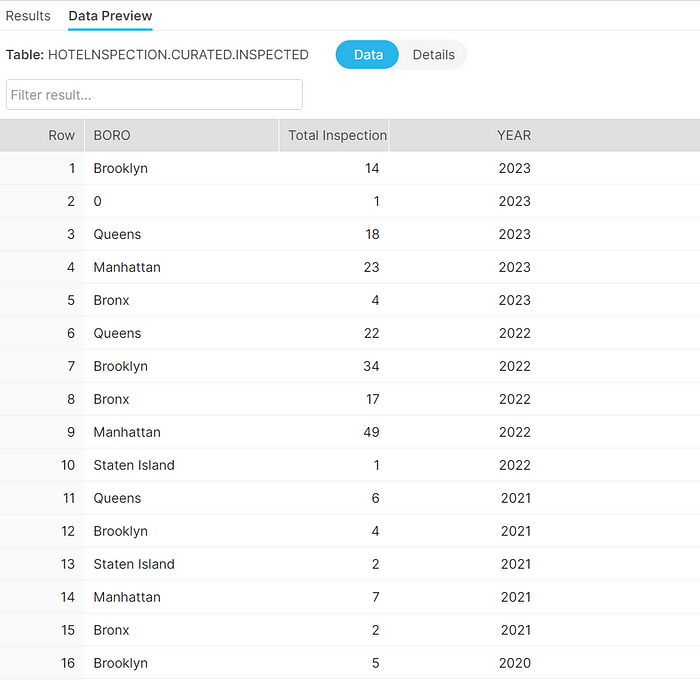
ORDER BY YEAR(CAST(Inspection_date AS DATE)) DESC;Our newly created table inspectedhotels
This is a simple ELT pipeline that uses a basic example for transformation.
When working on real and larger ELT projects, there are certain things to consider during the Extracting-Loading stage.
- Data quality: Data quality issues like missing or duplicate data can cause problems in the pipeline. To avoid these issues, it’s essential to have a data validation process in place to identify and address them.
- API Changes: If the source API undergoes changes, the pipeline may need to be updated to accommodate the changes. It is important to establish a monitoring process to keep track of API changes and make necessary updates to the pipeline
- Network Latency: When extracting data from a remote source, network latency can cause performance issues. It’s important to monitor the network connection and optimize the pipeline to minimize latency.
- We can only load files up to 16 GB of data directly into Snowflake using an internal stage. To load bigger files, we should use external storage in cloud services.
- Additionally, the pipeline created in this example is static. However, if we need to extract data from an API every day, we should append the data incrementally to our table instead of overwriting it. To achieve this, we can add a timestamp column to the table to track when the data was loaded. This column can be used to filter out old data during subsequent runs.
Thank you for taking the time to read this. I’d love to hear your thoughts and insights, so don’t hesitate to leave a comment. If you have anything to add, please feel free to comment!
Feel free to connect with me on LinkedIn!